Serial ports provide an easy way to communicate between many types of hardware and your computer. They are relatively simple to use and are very common among peripherals and especially DIY projects. Many platforms such as Arduino have built in serial communication so they are really easy to set up and use. Many times you may want your project to communicate with your computer in order to have a cool interactive output, a neat sensor that passes data to your computer, or anything else you could possibly dream up. In this tutorial, I will walk you through how to interface to a serial port on the computer side of things, using Microsoft’s . net framework. The code examples in this tutorial are in C#, but can be easily transferred to Visual Basic, or Visual C++. This tutorial assumes that you have a very basic understanding of object oriented programing, and whatever language you choose to program in.
Since we are mainly going to be using the System.IO.Ports.SerialPort class, HERE is a link to the full documentation by MSDN if you want to check out the rest of the class.
I also found a great article explaining how to fix several common bugs relating to serial ports. Check it out if you get stuck with any odd errors.
Feel free to post questions or feedback! I am always happy to hear constructive comments so I can make improvements.
Step 1: Set-up and Open the Serial Port
We need to include two namespaces in order to use the SerialPort class:
using System.IO.Ports;
using System.IO;
We now need to instantiate a SerialPort object. There are several constructors to choose from to specify different frame formats but in general the easiest to use is the following:
SerialPort(string portName, int baudRate)
An example of this would be:
SerialPort mySerialPort = new SerialPort( “COM3”, 9600);
Here I am using COM3 at 9600 baud. You can find the full list of constructors in the link in the intro. Now that we have created our SerialPort object, we need to open the port using the Open() method. When we are done we will want to close it using the Close() method:
mySerialPort.Open();
mySerialPort.Close();
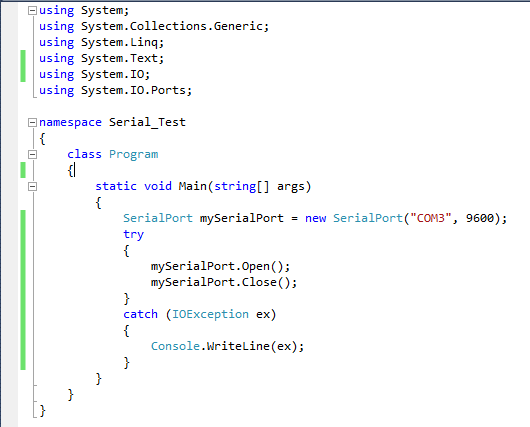
Several notes: when you use any operation that uses a serial port there is a good chance that an error will occur. For this reason we want to write our code for the serial port within a try – catch block. This will prevent our program from crashing if, for example we tried to open a port that didn’t exist. It is not necessary to instantiate our object within the try – catch block, but we want to open, close, read, and write within it.
//this simply creates a SerialPort object then opens and closes the port
SerialPort mySerialPort = new SerialPort( “COM3”, 9600);
try
{
mySerialPort.Open();
mySerialPort.Close();
}
catch (IOException ex)
{
Console.WriteLine(ex);
}
That’s really all there is for port setup! In the next step we will introduce how to read from a serial port.
Step 2: Reading From the Port
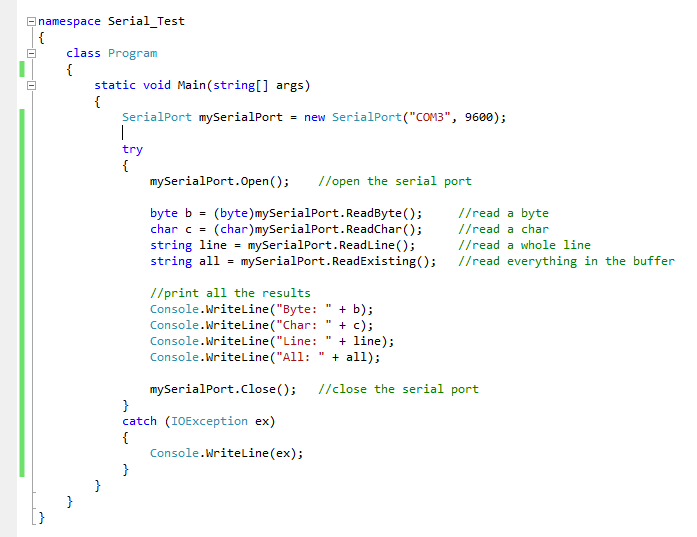
Now that we have created our serial port object and opened the port, we now want to read from the serial port. Here are the basic read functions: (there are several other, but these are the simplest and will work for most applications)
int readChar() – returns the next char from the input buffer
int readByte() – returns the next byte from the input buffer
string readLine() – returns everything up to the newline character (‘\n’) in the input buffer
string readExisting() – returns everything in the input buffer
It should be noted that readChar() and readByte() both return integers not chars and bytes respectively. In order to convert them to their corresponding types, you will need to typecast them into their respective types:
char nextChar = (char)mySerialPort.readChar();
byte nextByte = (byte)mySerialPort.readByte();
The other two methods are pretty self-explanatory. In the next step I’m going to go a little more in depth about how we would go about reading from a port.
*Technical note*
It is worth noting that both ReadLine(), ReadExisting() return a string based off of decoded bytes from the input buffer. What does that mean? It means that for example if we received the bytes 0x48, 0x69, and 0x0A those would be decoded based off of the ASCII encoding to ‘H’ , ‘I’ , and ‘\n’. This is significant because if we wanted our hardware to send the numeric value of 65 (0x41), and we used ReadExisting() and printed the return value to a console window we would get an output of “A” not “65” because it decoded 0x41 and changed it to ‘A’. If you wanted to read the actual numeric value you should use readByte() or readChar() since they return integer values which are not decoded. The SerialPort class supports multiple encodings other than the default ASCII through the SerialPort.Encoding property; there is plenty of information about that in the link in the intro.
Step 3: Ways to Read From the Port

If we want to be continuously read from a serial port and, for the sake of example, display everything we read in a console window the simplest way to do this would be to do this would be to create a loop and repeatedly call one of our read methods. While this method gets the job done, there are some significant disadvantages to it. First, it is very limiting since you have to be constantly calling the same method over and over again and you’re stuck within the loop.
Another problem that arises with the read methods is that if there is no data in the input buffer when you call them, they will stall the execution of your program until there is valid data to read (this is similar behavior to the Console.ReadLine() method; the program doesn’t continue until the user hits enter). There are properties that you can set to force the method to return after a specific delay, but in general you don’t want your program to run slower than it has to.
A better way to be continuously reading is to check if there is data to be read in the input buffer using the SerialPort.BytesToRead property. This property returns the number of bytes in the input buffer that need to be read. With this we could set up a loop that will skip over the read code if there is nothing in the input buffer. Here’s an example:
while (true)
{
try
{
if (mySerialPort.BytesToRead > 0) //if there is data in the buffer
{
mySerialPort.ReadByte(); //read a byte
}
//other code that can execute without being held up by read method.
}
catch (IOException ex)
{
//error handling logic
}
}
This procedure certainly is more efficient that the previous method and will work for many simple situations where all you are really doing is continuously reading from the port. Let’s take a look at a different scenario. What if you were creating a large complex program that was handling many tasks and would not be able to work within the confines of an infinite loop? Luckily for you, the SerialPort class has created an event that is raised whenever there is new data in the input buffer. For anyone who doesn’t know what an event is, an event is something that interrupts your program when something important happens, calls a method to deal with the event, and then returns to where the program left off. In our case when data is received by the input buffer, the event will stop the program, call a method where we would most likely handle the data, and then go back to where our program left off. We will delve into this in the next step.
Step 4: Reading Using Events

The first thing we need to do is to tell our serial port what method to call when it receives data. This is done with the following line:
mySerialPort.DataReceived += new SerialDataEventHandler(mySerialPort_DataRecieved);
mySerialPort.DataReceived represents the method that is called to handle the event. We specify that method by the following part += new SerialDataEventHandler(mySerialPort_DataRecieved) which says use the method mySerialPort_DataRecieved when the event is raised. Next we have to actually create the method:
public static void mySerialPort_DataRecieved(object sender, SerialDataReceivedEventArgs e)
{
//whatever logic and read procedure we want
}
That’s really all there is to it. Just one more note: you will want to make sure when using events that you declare your SerialPort object as a class level field so that you can use it in multiple methods including the event handler. Different methods and procedures fit different situations, so you will have to find one that works and that you like to use. I personally like using the events whenever possible since they are the most efficient and leave the program free to do other things, but everyone has their preferences. In the next step I am going to talk about how to write to a serial port.
Step 5: Writing to the Port
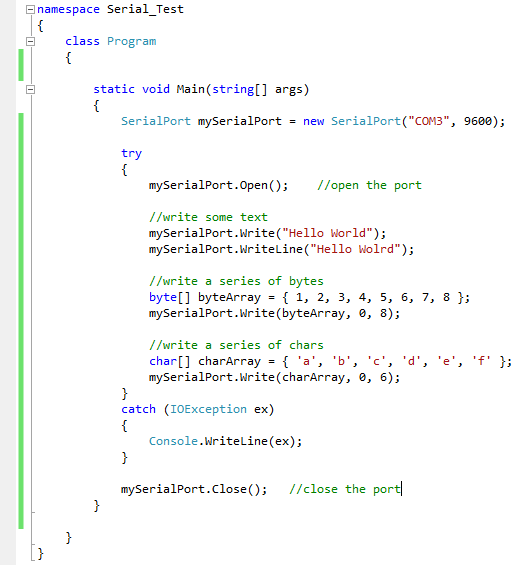
Good news! Writing to a port is incredibly easy! Here are the write methods that you can use:
Write(String data)
WriteLine(String data)
Write(byte[] data, int offset, int length)
Write(char[] data, int offset, int length)
The first two methods are almost identical, except that WriteLine() writes a newline character(‘\n’) after writing the data. The other two write methods are also similar; the only difference is the data type of the data to send. To use them, you provide an array of bytes or characters which will be written to the serial port. The offset parameter just specifies what element of the array to start at i.e. If you pass it 0, it will start at the very beginning of the array; if you pass 1 it will start at the second element. The length parameter is simply the length of the array. Remember to perform these write operations within a try-catch block because they readily throw errors.
*Technical Note*
Remember encoding from step 2? The same concept is applied to Write() and WriteLine(). The call WriteLine(“Hi”) writes 0x41, 0x61, 0x0A (0x0A is the added ‘\n’ since we used WriteLine()). If we want to recognize them as characters on the hardware side you must have your own decoding logic present there.
Step 6: Conclusion

I hope this is helpful to you and your next project. This was something that I personally struggled to figure out so I hope that this will help you have an easier time learning how to interface over a serial port. Feel free to post comments, questions and feedback below.