รายละเอียดหาดูได้ที่  www.acronis.com
กล่าวถึงโปรแกรม Acronis TrueImage เป็นโปรแกรมจำพวกเดียวกับ Ghost ครับคือโคลนนิ่งหรือใช้แบ็คอับข้อมูล นั่นเองครับ
การโคลนด้วย Acronis  นั้นโปรแกรมมี 2 ชุดครับ * Acronis TrueImage Workstation
                                                                           และ * Acronis TrueImage Enterprise Server
ความ สามารถก็จะต่างกันออกไปครับ Acronis TrueImage Workstation  ตัวนี้จะใช้ได้เฉพาะ Local เท่านั้นครับ…แต่เท่าที่ดูน่าจะได้(ไม่ชัวร์ 100%)นะครับ
 ส่วนตัวนี้ Acronis TrueImage Enterprise Server  ใช้ในระบบ Network ได้ครับ เช่น การโคลนนิ่งพร้อมกันหลายๆเครื่อง ผ่าน ระบบ Lan ครับ

แต่ในหัวข้อนี้เราจะกล่าวเฉพาะ  Acronis TrueImage Workstation   และตัวช่วย Acronis Universal Restore ครับ

ใน การโคลนต่าง Hardware นั้นต้องอาศัย AcronisUniversal Restoreช่วย ครับ  เช่นเดียวกับการใช้ sysperp (System Preparation) ในการย้ายระบบครับ

ขั้นตอนคร่าวๆก็มีดังนี้ครับ
*ติดตั้ง OS +โปรแกรมต่างๆให้ครบตามที่ต้องการครับ
*ติดตั้ง Acronis TrueImage Workstation
*ติดตั้ง AcronisUniversal Restore
*สร้างแผ่นบูตระบบ
*ทำการBackup Patition หรือ disk ไว้เป็น Image
*ทำการ รีสโตร์ ลง Patition หรือ disk ที่ต้องการ
รีสตาร์ทขั้นตอนสุดท้ายก็จบพิธีครับ

ขั้นตอนการติดตั้งซะหน่อยครับ
ก็เริ่มจากติดตั้ง  Acronis TrueImage Workstation

Read More

This is the numbering for each Nero 9 component.

1 InCD
3 NeroBackItUp
4 NeroBurningROM
5 NeroCoverDesigner
6 NeroExpress
8 NeroImageDrive
9 NeroMediaHome
10 NeroPhotoSnap
12 NeroRecode
13 NeroShowTime
14 NeroSoundTrax
15 NeroStartSmart
16 NeroVision
17 NeroWaveEditor
19 NeroDriveSpeed
20 NeroInfoTool
21 NeroRescueAgent
22 NeroBurnRights
30 Nero ProductInstaller (Mandatory)
49 NeroMoveIt
50 NeroDiscCopy_Gadget
53 SecureDiscViewer
57 NeroDiscSpeed
61 NeroLicense
62 AuthoringTemplates_StarterKit
63 NeroControlCenter (Mandatory)
64 MovieTemplates_StarterKit
65 MovieTemplates_Pack1
66 AuthoringTemplates_Pack1
67 AuthoringTemplates_Pack2
68 AuthoringTemplates_Pack3
69 DolbyFiles
71 Nero Live
74 LiveGadget
75 AskToolbar

The DEFINITION of bloadware! WAKE UP AHEAD!!!

Anyway. This is the installation command.

Nero-9.2.6.0.exe /i /qb SERIALNUMBER=”xxxx-xxxx-xxxx-xxxx-xxxx-xxxx-xxxx-xxxx” EULAACCEPTED=”1″ REMOVEAPP=”unit_app_1, unit_app_5, unit_app_10, unit_app_12, unit_app_13, unit_app_14, unit_app_15, unit_app_16, unit_app_17, unit_app_19, unit_app_20, unit_app_21, unit_app_22, unit_app_50, unit_app_57, unit_app_61, unit_app_62, unit_app_64, unit_app_65, unit_app_66, unit_app_67, unit_app_68, unit_app_69, unit_app_71, unit_app_74, unit_app_75″

As you can see from the command, only nero burning rom (4) and nero express (6) will be installed. The rest will not be installed. This is my setup and you can play with the command as you like, removing or adding nero components.

I have read that you MUST install number 61 also, or nero will not open, but that’s not true. All you have to do is get AdvrCntr4.dll and run regsvr32 /s AdvrCntr4.dll This will install the registration component but will not install NeroLicense, which is good, because nero wont ask you to register with ahead every once in a while. To get AdvrCntr4.dll, run nero setup, let it finish extracting and go to “%tmp%nro.tmp”

This setup configuration will not make the nero executable any smaller. I personally don’t care. I like the fact that I can use the original installer and just use a switch to customize my installation. I also like the fact that I don’t have to extract, modify, delete, rebuild blah blah blah…

Since we all know that Nero is getting more bloated with every version they publish, I decided to continue where Acheron stopped. I created lite installer of Nero 9. But my installer is quite different from his. I created my own installer, so I’m not using Inno for it, and I’m not considering using it because this way it’s easier for me.

Nero Lite installer includes following products:

– Nero BurningROM (Included in Micro version);
– Nero Express; (Included in Micro version)
– Nero Cover Designer;
– Nero ToolKit (DiscSpeed, DriveSpeed, InfoTool, BurnRights);
– Nero WaveEditor;

To use Nero 9 Lite you need to have valid serial.

Nero Lite installer information:

– Size: 42.99 MB
– MD5: 724ae24993665fe994a6e8fe1ed8d6b7


Nero Lite installer – Micro information:

– Size: 28.79 MB
– MD5: 6f5a61c1f6ac83789c6cc0cb446b345f


Nero Lite Multilanguage installer information:

– Size: 46.33 MB
– MD5: 9dd40a1c8835a9729d1ad4c81525fcba


Nero Lite Multilanguage installer – Micro information:

– Size: 30.94 MB
– MD5: e365e773df18d7aa10dc34a53d5e11ee

Nero 9 Requirements:

– Windows Installer 3.1 or higher
Microsoft Visual C++ 2005 SP1 Redistributable

The size of this installer is larger then Acheron’s because Nero files are now bigger.

Read More

CyberLink today launched the latest in its DVD player software CyberLink PowerDVD 9  which is offering DVD upscaling technology. PowerDVD 9 feature highlights include the new TrueTheater Technology  which is offering DVD up-scaling to HD-like quality Cinema Mode for watching Blu-ray Discs via Windows Media Center. It is a suite of advanced video and audio enhancement technologies such as the “TrueTheater HD” that up-scales DVD video for HD-like results and the “TrueTheater Motion” that up-converts DVD video frame rates for smoother playback. In additon  the “TrueTheater Stretch” technology stretches video without image distortion  while the “TrueTheater Lighting” enhances video image for a brighter  clearer movie. Last but not least  the “TrueTheater Surround” creates multichannel audio output for conventional stereo speakers.

Main features:
&#187  TrueTheater Technology for maximizing your DVD Playback
&#187  Watch Blu-ray movies like never before
&#187  Play more HD video formats like MPEG-4 AVC (H.264)  MPEG-2 HD  WMV-HD  and SMPTE VC-1 files
&#187  PC friendly for enjoying smooth high-definition playback on both powerful or energy-efficient computers or notebooks
&#187  New support for HDMI 1.3
&#187  Rate your movies
&#187  FancyView navigates in an animated fashion
&#187  Cinema Playback Mode
&#187  Remix Your Movies

Home page – http://www.cyberlink.com/multi/products/main_1_en_US.html

รายละเอียดตามไปอ่านกันดูนะครับ ขอเริ่มการติดตั้งเลยดีกว่า

Read More

ท่าน
สามารถดาวน์โหลดลักษณะของตารางผลลัพธ์ (Look)
ได้ตามแบบตารางที่ท่านต้องการ
โดยทุกตารางที่สร้างขึ้นสนับสนุนภาษาไทยทั้งหมด
โดยท่านจะต้องมีฟอนต์ภาษาไทยตามที่ระบุไว้ในเครื่องของท่าน
ท่าน
สามารถดาวน์โหลดลักษณะตารางผลลัพธ์ (Look) ได้ โดยการวางเมาส์ไว้ที่ลิงก์
และคลิกปุ่มขวาของเมาส์ เลือก Save Target As…
จัดเก็บไฟล์ลงในไดเรคทอรี่ที่ท่านต้องการ จากนั้นให้ท่านใช้โปรแกรม Winzip
หรือ Winrar คลายไฟล์ zip ออกมา จะปรากฏไฟล์ที่มีนามสกุลเป็น *.tlo
ให้ท่าน copy ไปไว้ในไดเรคทอรี่ c:Program FilesspssLooks
ท่าน
สามารถเรียกใช้ลักษณะของตารางผลลัพธ์ได้ (Look) โดยการเข้าโปรแกรม SPSS
for Windows คลิกเลือกเมนู Edit และเลือกเมนูย่อย Options…
จะปรากฎหน้าต่าง Option

ที่
หน้าต่าง Options ให้คลิกเลือกที่ Pivot Tables จะปรากฎ Looks
ของผลลัพธ์ในช่อง TableLook ให้เลือก Look ที่ดาวน์โหลดไปจากเว็ปไซด์หรือ
Look ในแบบที่ท่านต้องการ จากนั้นคลิกปุ่ม Apply และปุ่ม OK


  • thai1.zip
  • ฟอนต์ภาษาไทย EucrosiaUPC ขนาดตัวอักษร 16


  • thai2.zip
  • ฟอนต์ภาษาไทย DillenialUPC ขนาดตัวอักษร 14


  • thai3.zip
  • ฟอนต์ภาษาไทย EucrosiaUPC ขนาดตัวอักษร 14

    1.เปิดหน้าต่าง command โดยคลิก Start > Run พิมพ์ CMD กด OK

    2.ให้ไปที่ C:> เสร็จแล็วให้พิมพ์คำสั่งดังนี้

    CD WINDOWS/DRIVER CACHE/i386

    เมื่อมาที่โฟลเดอร์นี้แล้ว จะมีไฟล์สำคัญ 4 ไฟล์ ที่ต้องใช้ในการนี้ คือไฟล์ Atapi.sys, Intelide.sys,Pciide.sys และ Pciidex.sys ซึ่งจะอยู่ในรูปของไฟล์ .CAB ที่ชื่อ Driver.cab หรือ SP1.cab หรือ SP2.cab (แล้วแต่กรณีรุ่นของวินโดวส์)คุณต้องขยายไปเก็บไว้ที่โฟลเดอร์ C:/windows/System32/Drivers

    ในกรณีที่ใช้ Windows XP ธรรมดา (ไม่มี Service pack)
    expand driver.cab -f:atapi.sys c:windowsSystem32Drivers กด ENTER
    expand driver.cab -f:intelide.sys c:windowsSystem32Drivers กด ENTER
    expand driver.cab -f:pciide.sys c:windowsSystem32Drivers กด ENTER
    expand driver.cab -f:pciidex.sys c:windowsSystem32Drivers กด ENTER

    ในกรณีที่ใช้ Windows XP Service pack1
    expand sp1.cab -f:atapi.sys c:windowsSystem32Drivers กด ENTER
    expand sp1.cab -f:intelide.sys c:windowsSystem32Drivers กด ENTER
    expand driver.cab -f:pciide.sys c:windowsSystem32Drivers กด ENTER (สำหรับไดร์เวอร์ตัวนี้ต้องใช้ของวินโดวส์ธรรมดา)
    expand sp1.cab -f:pciidex.sys c:windowsSystem32Drivers กด ENTER

    ในกรณีที่ใช้ Windows XP Service pack2
    expand sp2.cab -f:atapi.sys c:windowsSystem32Drivers กด ENTER
    expand sp2.cab -f:intelide.sys c:windowsSystem32Drivers กด ENTER
    expand driver.cab -f:pciide.sys c:windowsSystem32Drivers กด ENTER (สำหรับไดร์เวอร์ตัวนี้ต้องใช้ของวินโดวส์ธรรมดา)
    expand sp2.cab -f:pciidex.sys c:windowsSystem32Drivers กด ENTER

    4.ให้ก็อป script ข้างล่างนี้ ปะใน notepad แล้วเซฟเป็นชื่อ xp2k-idefix.reg ให้ดับเบิลคลิกที่ไฟล์นี้ ตอบ Yes และ OK

    Read More

    รวมวิธีแก้ sign in เข้าMsnไม่ได้
    ที่มา คุณ NaDaRa
    มาดูวิธีแก้คับ
    เนื่องจากในปัจจุบันมีปัญหาใหม่จากอันเก่าที่เป็นรหัส 80048820 ซึ่งหลายคนคงจำรหัสนี้ได้เป็นอย่างดีมาแล้ว
    ปัจจุบันมีรหัสใหม่ที่อาจจะป่วนใครหลายคนได้เป็นอย่างดีเหมือนกัน นั่นคือรหัส 80048883
    ซึ่งเป็นของแถมจาก MSN Version ใหม่ ๆ ซึ่งผู้ร่วมพัฒนาจึงได้แก้มาเป็น Version 7.5.0324 ให้เลยครับ มันเลยหลายเป็น Unofficial Released นะครับ

    สาเหตุที่เกิด โดยดูจาก Errorcode
    ErrorCode : 80048883
    1. ให้ไปที่
    http://clientconfig.passport.net/ppcrlconfig.bin
    2. แล้วโหลดไฟล์นั้นแล้วเปลี่ยนชื่อเป็น ppcrlconfig.dll นะครับ
    3. แล้วคลิ๊กขวา copy แล้วไป paste ที่ C:Documents and Settings[Windows USER]Application DataMicrosoftIdentityCRL
    4. แล้วลองเข้าดูครับ

    ErrorCode : 80048848
    – สาเหตุ: เกิดจากปัญหาของ Firewall หรือการติดต่อออกอินเตอร์เน็ต มีปัญหา
    – วิธีแก้: แก้ตามวิธีแก้ที่ 1 และ 2 ครับ

    ErrorCode : 81000362
    – สาเหตุ: เกิดจากที่ตัว IE เปิด Work OffLine ไว้ครับ
    – วิธีแก้: แก้ตามวิธีแก้ที่ 11 ครับ

    ErrorCode : 800b001
    – สาเหตุ: เกิดจาก MSN หาไฟล์พวก .dll บางตัวไม่เจอ ทำให้ไม่สามารถ sign in ได้
    – วิธีแก้: แก้ตามวิธีแก้ที่ 3 คับ

    ErrorCode : 80048820
    – สาเหตุ: เกิดจากวันที่ของเครื่องไม่ถูกต้อง
    – วิธีแก้: แก้ตามวิธีแก้ที่ 3 คับ หรือตั้งวันที่ใหม่ครับ (แนะนำเพิ่มเติมเล็กน้อย)ควรตั้งเวลาที่Biosด้วย

    ErrorCode : 80072ee7
    – สาเหตุ: เกิดจากปัญหาของ Firewall หรือการติดต่อออกอินเตอร์เน็ต มีปัญหา
    – วิธีแก้: แก้ตามวิธีแก้ที่ 1 และ 2 คับ

    ErrorCode : 80072eff , 80070193 , 800701f7
    – สาเหตุ: เป็นปัญหาจาก .NET Messenger Service มีปัญหา ซึ่งอาจจะเกิดจากตัว .Net server
    – วิธีแก้: แก้ตามวิธีแก้ที่ 1 , 2 และ 4 คับ

    ErrorCode : 80072efd
    – สาเหตุ: ปัญหานี้เกิดจาก ในส่วนของ windows update
    – วิธีแก้: แก้ตามวิธีแก้ที่ 1 , 2 , 3 และ 5 คับ

    ErrorCode : 80072f0d
    – สาเหตุ: เกิดจากที่ส่วนที่เกี่ยวข้องกับ security ของ MSN ไม่ทำงาน
    – วิธีแก้: แก้ตามวิธีแก้ที่ 1 , 2 , 3 และ 6 คับ ถ้ายังไม่หายให้เพิ่มข้อ 10 ด้วยคับ

    ErrorCode : 80070190
    – สาเหตุ: เกิดจากปัญหาการเชื่อมต่ออินเตอร์เน็ต
    – วิธีแก้: แก้ตามวิธีแก้ที่ 1 , 2 , 4 และ 3 คับ

    ErrorCode : 80070301
    – สาเหตุ: เกิดจากปัญหา ของ .NET Messenger Service
    – วิธีแก้: แก้ตามวิธีแก้ที่ 1 , 2 , 4 , 7 และ 8 คับ

    ErrorCode : 81000303 หรือ ” Microsoft .NET Passport has made your account temporarily unavailable to help prevent other users from guessing or obtaining your password.”
    – สาเหตุ: เกิดจากปัญหา ของ .NET Messenger Service หรือ รหัสผ่านผิด
    – วิธีแก้: แก้ตามวิธีแก้ที่ 1 , 2 , 3 ,4 และ 7 คับ

    ErrorCode : 81000306
    – สาเหตุ: เกิดจากปัญหา ของ .NET Messenger Service หรือ การเชื่อมต่ออินเตอร์เน็ต
    – วิธีแก้: แก้ตามวิธีแก้ที่ 1 , 2 , 4 และ 8 คับ

    ErrorCode : 81000314
    สาเหตุ: ไฟล์ dll บางไฟล์ของ MSN ยังไม่ได้ทำการ Register
    วิธีแก้:
    – โหลดโปรแกรมนี้ไปแล้วกดเปิดครับ http://www.msn-th.com/downloads/msnallreg.bat
    ErrorCode :80072745
    สาเหตุ: เกิดจากปัญหาการเชื่อมต่ออินเตอร์เน็ต
    วิธีแก้:
    – ตรวจเช็ค Internet ว่า Connect อยู่หรือป่าว…
    – ปิด Firewall ทั้งของ Windows , Router และโปรแกรม Antivirus ต่างๆ
    – Register DLL files และตั้งวันที่ใหม่ โดยใช้ไฟล์นี้คับ
    http://www.msn-th.com/downloads/msnallreg.bat
    – เช็ค .Net Messenger Service server อาจมีปัญหา ลองคลิ๊กที่นี่เพื่อตรวจสอบ ว่า Server รันอยู่หรือป่าว
    —————————————————————————————————

    วิธีแก้:
    1. ตรวจเช็ค Internet ว่า Connect อยู่หรือป่าว…

    2. ปิด Firewall ทั้งของ Windows , Router และโปรแกรม Antivirus ต่างๆ

    3. รีเซ็ต Register DLL files ของ MSN และตั้งวันที่ใหม่ โดยใช้ไฟล์นี้คับ

    4. เช็ค .Net Messenger Service server อาจมีปัญหา ลองคลิ๊กที่นี่เพื่อตรวจสอบ ว่า Server รันอยู่หรือป่าว

    5. Internet Explorer ต้องสนับสนุน การเข้ารหัสแบบ 128 bit ให้ตรวจสอบ โดยดูได้ด้วยการคลิกเมนู Help->About ใน IE
    ถ้าไม่ใช่แนะนำให้ลง IE6 ใหม่อีกรอบคับ

    6. เปิด Internet Explorer ไปที่เมนู Options -> Internet Options.. -> Advancd แล้วดูที่หัวข้อ use SSL 2.0 และ use SSL 3.0 ให้ติ๊กถูกทั้ง 2 อัน

    7. ให้ตรวจสอบ user name และ password ให้แน่ใจด้วยการกรอกใหม่อีกครั้งระวังตัวพิมพ์เล็กและใหญ่ด้วยนะคับ

    8. ไปที่ Start -> Run พิมพ์ %appdata%microsoft กด Enter และลบโฟล์เดอร์ชื่อ MSN Messenger (Emo และ DP ที่เพิ่มเข้าไปจะหายไปหมด)

    9. อาจถูกบล็อคการใช้งานจากผู้ดูแลระบบ ลองติดต่อ admin คับ

    10. ไปที่ Start -> Run พิมพ์ regsvr32 initpki.dll กด Enter แล้วรอครับอาจจะนานหน่อยเป็น 10 นาที…
    11. ตรวจเช็คการตั้งค่าใน IE และ MSN

    เช็คว่า IE OffLine ไว้หรือป่าว
    – เรียก Internet Explorer ขึ้นมาคับ
    – กดที่เมนู File แล้วดูที่ Work Offline ว่ามีติ๊กไว้หรือป่าวถ้ามีให้เอาออก
    ตรวจเช็คการตั้งค่า Proxy ใน IE
    – เรียก Internet Explorer ขึ้นมาคับ
    – กดที่เมนู Tools –> Internet Options
    – คลิ๊กที่แท็บ Connections กดปุ่ม LAN Settings คับ
    – เอาตัวติ๊กทั้งหมดออกคับ
    – กด OK 2 ที
    ตรวจเช็คการตั้งค่า Proxy ใน MSN
    – เรียก MSN Messenger ขึ้นมาคับ
    – กดที่เมนู Tools — Options คับ
    – เลือกที่ Connection กดปุ่ม Advanced Settings
    – ลบทุกอย่างที่เติมไว้ในบล็อคคับ
    – กด OK 2 ที

    12. ตรวจเช็คไฟล์ hosts (อาจโดนเปลี่ยนโดย Spyware บางตัว)
    – กดที่ Start —> Run
    – พิมพ์ notepad %SystemRoot%system32driversetchosts
    – แล้วลบทั้งหมดออกเหลือไว้แต่ 127.0.0.1 , localhost แค่บรรทัดเดียวคับ
    – แล้วสั่ง File –>Save แล้วปิดไปเลยคับ

    ปล.ถ้าใครทำแล้วยังใช้ไม่ได้ให้ลองเพิ่มข้อ ,11 และ 12 ด้วยคับ

    ขอบคุณ Mthai.com, msn-problems.com, Adslthailand.com  ที่ให้ข้อมูลคับ

    ปล. ขอให้โชคดี นะครับ
    แก้ไขเมื่อ 24 ก.ย. 49 06:45:15

    จากคุณ : ออนไลน์   – [ 24 ก.ย. 49 06:44:12 ]
    **********************************************************************
    ข้อมูลจาก http://topicstock.pantip.com/wahkor/topicstock/2006/09/X4735380/X4735380.html ครับ ลัลล้า~*

    Windows Vista
    Service Pack 1 OEM x86

    Installation Options:

    Windows Vista Business Edition
    Windows Vista Home Basic Edition
    Windows Vista Home Premium Edition
    Windows Vista Starter Edition
    Windows Vista Ultimate Edition
    เวลาจะลงเป็น version อื่นต้องใช้ key version นั้นๆ
    6F2D7-2PCG6-YQQTB-FWK9V-932CC Asus Ultimate
    72PFD-BCBK8-R7X4H-6F2XJ-VVMP9 Asus Business
    BH626-XT3FK-MJKJH-6GQT2-QXQMF Asus Home Premium
    8XPM9-7F9HD-4JJQP-TP64Y-RPFFV Asus Home Premium
    2WP98-KHTH2-KC7KG-4YR37-H8PHC Asus Home Basic
    762HW-QD98X-TQVXJ-8RKRQ-RJC9V Asus Home Basic
    2TYBW-XKCQM-XY9X3-JDXYP-6CJ97 Acer Home Premium
    6F2D7-2PCG6-YQQTB-FWK9V-932CC HP Ultimate
    2R6WF-KYF88-27HYQ-XTKW2-WQD8Q HP Home Premium
    GP3FQ-JB647-7CW8F-H646B-7PMGF HP Home Premium

    SHA1: BCD715A02739809E477C726AE4B5CAA914156429

    ISO/CRC: CE4CB528

    This is an original OEM DVD(Straight From My Workplace, The DVD That We
    Use To Install Vista On Computers). With NO Serial Number, Thats What
    Cracks Are Made For

    You must do a clean install(For Best Results). Burn image to DVD, boot
    to DVD, install Vista without a product key, Find Crack On TPB, And
    Enjoy

    This Is Vista OEM, Vista only, No Extra Bloated Useless Manufacturer Software….!

    This is 32bit, burn (At SLOWEST Speed) the image using a program like
    Nero, UltraISO, Power ISO, or whatever you like, you must do a clean
    install. This is an oem image with SP1, and you can install using the
    product key on your notebook
    or desktop
    , but if you use a key, you can only install the version that you
    had,(If You Have A Good OEM Crack) you can install any version… hope
    this helps…

    By the way, make sure you guys don’t install KB 940510. This update’s only purpose is to detect things like Vista Cracks
    http://support.microsoft.com/kb/940510

    Oh, I almost forgot, yes you can also dual boot with this…

    After Installation Use This Good Torrent By PlanetMaster For A Good PC Cleaner:
    http://thepiratebay.org/torrent/4023387/Webroot_Window_Washer_6.5.5.155

    คำคอมเม้นของพวกฝรั่งอ่า
    ITS WORKING GOOD… I WRITE THIS MAIL FROM MY NEW VISTA HOME PREMIUM !
    THANK YOU VERY MUCH !!!

    No keys are needed for Vista installations. Normally you can click next, and bypass entering a key.
    If you want to activate Vista without much trouble, then Vista Loader is the best.
    http://www.mydigitallife.info/2008/05/12/vista-loader-213-windows-vista-activator-2008-support-sp1-with-no-boot-string-free-download/
    I was just reading how WOW5 is supposedly better than Vista Loader, but
    I think the install process might be a little more complicated.
    http://forums.mydigitallife.info/showthread.php?t=3366

    How to enable AHCI : Windows XP « Expertester

    In case your your XP installation was done
    using IDE mode, and you decide to use AHCI for what ever reason, don’t
    worry. You can do that without reinstalling your Windows XP. This trick
    might usefull to for those who are confuse / lazy / afraid / <put
    your reason here> to slipstream AHCI driver into WinXP installation
    disc.

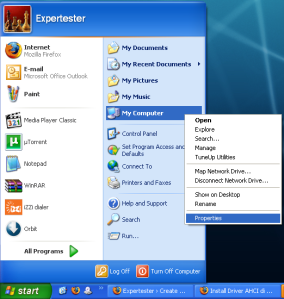
    • Start Device Manager (Right click on My Computer –> Property –> Hardware –> Device Manager

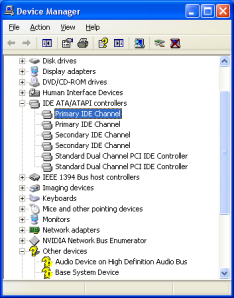
    • Right click on Primary IDE channel and choose Update Driver
      • Choose No, not at this time
      • Install a list or specific location (advance)
      • Don’t search. I will choose the driver to install

      • Have Disk
      • use AHCI driver (provided by manufacturer or download from net), in my case Acer 4530 provide AHCI driver for WinXP

    • Then, restart your computer/notebook
    • Enter BIOS (F2 usually for most notebook or DEL for most PC)
    • Change your SATA Mode to AHCI (instead of IDE)
    • Start your Computer (Windows)

    Done.

    ———————————————-

    Alternative Solution – Credit to Steve

    I took a slightly different approach.
    1) Get SATA drivers for Windows (whatever flavour you use)
    2) Control Panel, Add New Hardware.
    3) Yes, already connected, browse to the bottom, hit “add a new device”
    4) No, point it to the directory of your SATA drivers
    5) Choose your driver from the list that returns. (Mine was the nVidia SATA controller)
    6) Uninstall other standard IDE controllers.
    7) Reboot and enter your BIOS
    8) Change to AHCI mode
    9) Boot to Windows… which finds the *ACTUAL* AHCI controller, and installs the same driver as what you chose in step 5.
    10) Windows wants to reboot. Do that.
    11) Go to Device Manager and then uninstall the AHCI controller that
    you installed (there will be two or more now, but you want to get rid
    of the one with the exclamation mark)
    12) Success!

    That was a *LOT* easier than what I thought it would. After reading
    many guides on how to do it with Intel chipsets with home-made registry
    entries and copying files around… Installing the driver manually as a
    “dummy” effectively does all that for you anyway!

    Cheers people! The guide at the top was the closest that I found to succeeding, and put me on the right track!

    -Steve

    —————————————–

    Thanks Steve

    XP 32-bit Drivers Support for HP Pavilion dv4, Presario CQ45 & Presario CQ40 [Intel Platform]
    Date:8/26/2008.

    Important Notes:
    A.Suggest to copy the all the drivers from the DVD media to a temporary folder on local HDD C: drive
    B.You may need to reboot the system after each of the driver installation
    c.Ignore the prompt for “Found New Hardward Wizard” dialog box by clicking cancel button.
    D. Fn+F4 is not working on Discrete unit but you can toggle LCD via Nvidia control panel

    Drivers installation instruction:

    Please install the drivers in sequence order by going to the respective folder as below:

    1. flash the Bios to F.11C as follow:
    a. Copy the all the file from BIOS folder to either a DOS bootable diskette or a DOS bootable Thumbdrive
    b. Boot the unit via either a Dos bootable diskette or dos bootable thumbdrive
    c. At the DOS command prompt ->type Flash.bat and the unit shutdown after complete the BIOS flashing.

    2.MSUAA -> run setup.exe

    3.If the unit is using the Intel graphic then install the VGA driver from 3.Intel_VGA-32 folder -> run setup.exe

    3.If the unit is using the Nvidia graphic then install the VGA driver from 3.nVidia_VGA folder -> run setup.exe

    4.Audio -> run setup.exe

    5.Intel_Chipset -> run setup.exe

    6.Intel_MSM (Intel Storage matrix manager) -> run Setup.exe

    7.LAN (network driver) -> run setup.exe

    8.FingerPrint(if the unit has FP module) -> run setup.exe

    9.CIR (remote Infra red driver, if the unit has IR module) ->run setup.exe

    10.CardReader -> run Setup.exe

    11.Modem (modem driver, if the unit has modem module) -> run setup.exe

    12.Touchpad -> run setup.exe

    13.WLAN (wireless LAN driver) ->run setup.exe

    14.BTooth (if the unit has BT module) -> run setup.exe

    15.HP3DDG (HDD accelerometer, if the unit has the accelerometer module) -> run setup.exe

    16.HPMWWAN (if the unit has WWAN module) -> run setup.exe

    17.HPWWANCM (if the unit has WWAN module) -> run setup.exe

    18.TV Tunner (if the unit has TV tunner moduel) -> run setup.exe

    19.QLB (Quick launch button) -> run SP38688.exe